
Using Python environments in VS Code
An “environment” in Python is the context in which a Python program runs. An environment consists of an interpreter and any number of installed packages. The Python extension for VS Code provides helpful integration features for working with different environments.
Note: If you\’re looking to get started with Python in Visual Studio Code, refer to the tutorial Getting Started with Python in VS Code.
Select and activate an environment#
By default, the Python extension looks for and uses the first Python interpreter it finds in the system path. If it doesn\’t find an interpreter, it issues a warning. On macOS, the extension also issues a warning if you\’re using the OS-installed Python interpreter, because you typically want to use an interpreter you install directly. In either case, you can disable these warnings by setting python.disableInstallationCheck to true in your user settings.
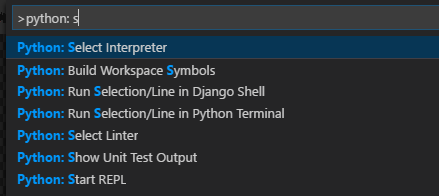
To select a specific environment, use the Python: Select Interpreter command from the Command Palette (Ctrl Shift P).
You can switch environments at any time; switching environments helps you test different parts of your project with different interpreters or library versions as needed.
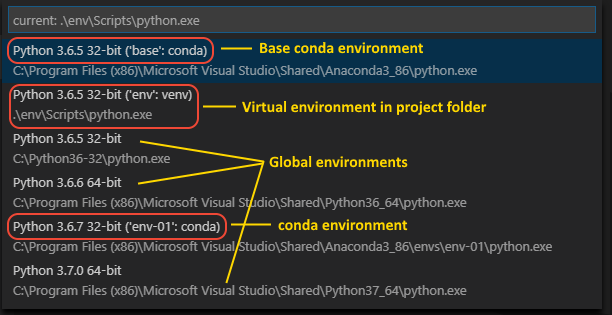
The Python: Select Interpreter command displays a list of available global environments, conda environments, and virtual environments. (See the Where the extension looks for environments section for details, including the distinctions between these types of environments.) The following image, for example, shows several Anaconda and CPython installations along with a conda environment and a virtual environment (env) that\’s located within the workspace folder:
Note: On Windows, it can take a little time for VS Code to detect available conda environments. During that process, you may see “(cached)” before the path to an environment. The label indicates that VS Code is presently working with cached information for that environment.
Selecting an interpreter from the list adds an entry for python.pythonPath with the path to the interpreter inside your Workspace Settings. Because the path is part of the workspace settings, the same environment should already be selected whenever you open that workspace. If you\’d like to set up a default interpreter for your applications, you can instead add an entry for python.pythonPath manually inside your User Settings. To do so, open the Command Palette (Ctrl Shift P) and enter Preferences: Open User Settings. Then set python.pythonPath, which is in the Python extension section of User Settings, with the appropriate interpreter.
The Python extension uses the selected environment for running Python code (using the Python: Run Python File in Terminal command), providing language services (auto-complete, syntax checking, linting, formatting, etc.) when you have a .py file open in the editor, and opening a terminal with the Terminal: Create New Integrated Terminal command. In the latter case, VS Code automatically activated the selected environment.
Tip: To prevent automatic activation of a selected environment, add
"python.terminal.activateEnvironment": falseto yoursettings.jsonfile (it can be placed anywhere as a sibling to the existing settings).
Note: By default, VS Code uses the interpreter identified by
python:pythonPathsetting when debugging code. You can override this behavior by specifying a different path in thepythonPathproperty of a debug configuration. See Choose a debugging environment.
The Status Bar always shows the current interpreter.
The Status Bar also reflects when no interpreter is selected.
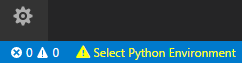
In either case, clicking this area of the Status Bar is a convenient shortcut for the Python: Select Interpreter command.
Tip: If you have any problems with VS Code recognizing a virtual environment, please file an issue in the documentation repository so we can help determine the cause.
Environments and Terminal windows#
After using Python: Select Interpreter, that interpreter is applied when right-clicking a file and selecting Python: Run Python File in Terminal. The environment is also activated automatically when you use the Terminal: Create New Integrated Terminal command unless you change the python.terminal.activateEnvironment setting to false.
However, launching VS Code from a shell in which a certain Python environment is activated does not automatically activate that environment in the default Integrated Terminal. Use the Terminal: Create New Integrated Terminal command after VS Code is running.
Note: conda environments cannot be automatically activated in the integrated terminal if PowerShell is set as the integrated shell. See Integrated terminal – Configuration for how to change the shell.
Any changes you make to an activated environment within the terminal are persistent. For example, using conda install from the terminal with a conda environment activated installs the package into that environment permanently. Similarly, using pip install in a terminal with a virtual environment activated adds the package to that environment.
Changing interpreters with the Python: Select Interpreter command doesn\’t affect terminal panels that are already open. You can thus activate separate environments in a split terminal: select the first interpreter, create a terminal for it, select a different interpreter, then use the split button (Ctrl Shift 5) in the terminal title bar.
Choose a debugging environment#
By default, the python.pythonPath setting specifies the Python interpreter to use for debugging. However, if you have a pythonPath property in the debug configuration of launch.json, that interpreter is used instead. To be more specific, VS Code applies the following order of precedence when determining which interpreter to use for debugging:
pythonPathproperty of the selected debug configuration inlaunch.jsonpython.pythonPathsetting in the workspacesettings.jsonpython.pythonPathsetting in the usersettings.json
For more details on debug configuration, see Debugging configurations.
Where the extension looks for environments#
The extension automatically looks for interpreters in the following locations:
- Standard install paths such as
/usr/local/bin,/usr/sbin,/sbin,c:\\python27,c:\\python36, etc. - Virtual environments located directly under the workspace (project) folder.
- Virtual environments located in the folder identified by the
python.venvPathsetting (see General settings), which can contain multiple virtual environments. The extension looks for virtual environments in the first-level subfolders ofvenvPath. - Virtual environments located in a
~/.virtualenvsfolder for virtualenvwrapper. - Interpreters installed by pyenv.
- Virtual environments located in the path identified by
WORKON_HOME(as used by virtualenvwrapper). - Conda environments that contain a Python interpreter. VS Code does not show conda environments that don\’t contain an interpreter.
- Interpreters installed in a
.direnvfolder for direnv under the workspace (project) folder.
You can also manually specify an interpreter if Visual Studio Code does not locate it automatically.
Note: Once the “select interpreter” flow is triggered, pipenv environments for the workspace folder will be searched for. If one is found, then no other interpreters are searched for or listed as pipenv expects to manage all aspects.
The extension also loads an environment variable definitions file identified by the python.envFile setting. The default value of this setting is ${workspaceFolder}/.env.
Global, virtual, and conda environments#
By default, any Python interpreter that you\’ve installed run in its own global environment, which is not specific to any one project. For example, if you just run python (Windows) or python3 (macOS/Linux) at a new command prompt, you\’re running in that interpreter\’s global environment. Accordingly, any packages that you install or uninstall affect the global environment and all programs that you run within that context.
Note: The Python Extension version 2018.8.1 and later automatically updates environments.
Although working in the global environment is an easy way to get started, that environment will, over time, become cluttered with many different packages that you\’ve installed for different projects. Such clutter makes it difficult to thoroughly test an application against a specific set of packages with known versions, which is exactly the kind of environment you\’d set up on a build server or web server.
For this reason, developers often create a virtual environment for a project. A virtual environment is a subfolder in a project that contains a copy of a specific interpreter. When you activate the virtual environment, any packages you install are installed only in that environment\’s subfolder. When you then run a Python program within that environment, you know that it\’s running against only those specific packages.
Note: While it\’s possible to open a virtual environment folder as a workspace, doing so is not recommended and might cause issues with using the Python extension.
Tip: A conda environment is a virtual environment that\’s created and managed using the
condapackage manager. See Conda environments for more details.
To create a virtual environment, use the following command, where “.venv” is the name of the environment folder:
# macOS/Linux
# You may need to run sudo apt-get install python3-venv first
python3 -m venv .venv

# Windows
# You can also use py -3 -m venv .venv
python -m venv .venv
When you create a new virtual environment, a prompt will be displayed to allow you to select it for the workspace.
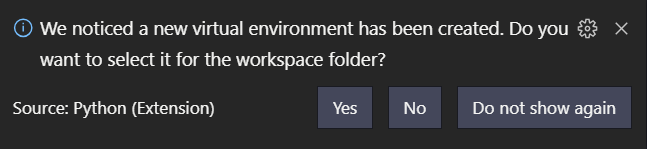
This will add the path to the Python interpreter from the new virtual environment to your workspace settings. That environment will then be used when installing packages and running code through the Python extension. For examples of using virtual environment in projects, see the Django tutorial and the Flask tutorial.
If the activate command generates the message “Activate.ps1 is not digitally signed. You cannot run this script on the current system.”, then you need to temporarily change the PowerShell execution policy to allow scripts to run (see About Execution Policies in the PowerShell documentation):
Set-ExecutionPolicy -ExecutionPolicy RemoteSigned -Scope ProcessNote: If you\’re using a version of the Python extension prior to 2018.10, and you create a virtual environment in a VS Code terminal, you must run the Reload Window command from the Command Palette and then use Python: Select Interpreter to activate the environment. If you have any problems with VS Code recognizing a virtual environment, please file an issue in the documentation repository so we can help determine the cause.
Tip: When you\’re ready to deploy the application to other computers, you can create a
requirements.txtfile with the commandpip freeze > requirements.txt(pip3on macOS/Linux). The requirements file describes the packages you\’ve installed in your virtual environment. With only this file, you or other developers can restore those packages usingpip install -r requirements.txt(or, again,pip3on macOS/Linux). By using a requirements file, you need not commit the virtual environment itself to source control.
Conda environments#
A conda environment is a Python environment that\’s managed using the conda package manager (see Getting started with conda (conda.io)). Conda works well to create environments with interrelated dependencies as well as binary packages. Unlike virtual environments, which are scoped to a project, conda environments are available globally on any given computer. This availability makes it easy to configure several distinct conda environments and then choose the appropriate one for any given project.
As noted earlier, the Python extension automatically detects existing conda environments provided that the environment contains a Python interpreter. For example, the following command creates a conda environment with the Python 3.4 interpreter and several libraries, which VS Code then shows in the list of available interpreters:
conda create -n env-01 python=3.4 scipy=0.15.0 astroid babelIn contrast, if you fail to specify an interpreter, as with conda create --name env-00, the environment won\’t appear in the list.
For more information on the conda command line, see Conda environments (conda.io).
Additional notes:
- If you create a new conda environment while VS Code is running, use the Reload Window command to refresh the environment list shown with Python: Select Interpreter; otherwise you may not see the environment there. It might take a short time to appear; if you don\’t see it at first, wait 15 seconds then try using the command again.
- To ensure the environment is set up well from a shell perspective, one option is to use an Anaconda prompt with the activated environment to launch VS Code using the
code .command. At that point you just need to select the interpreter using the Command Palette or by clicking on the status bar. - Although the Python extension for VS Code doesn\’t currently have direct integration with conda environment.yml files, VS Code itself is a great YAML editor.
- Conda environments can\’t be automatically activated in the VS Code Integrated Terminal if the default shell is set to PowerShell. To change the shell, see Integrated terminal – Configuration.
- You can manually specify the path to the conda executable to use for activation (version 4.4 ). To do so, open the Command Palette (Ctrl Shift P) and enter Preferences: Open User Settings. Then set
python.condaPath, which is in the Python extension section of User Settings, with the appropriate path.
Manually specify an interpreter#
If VS Code does not automatically locate an interpreter you want to use, you can set the path to it manually in your Workspace Settings settings.json file. With any of the entries that follow, you can just add the line as a sibling to other existing settings.)
First, select the File (Code on macOS) > Preferences > Settings menu command (Ctrl ,) to open your Settings, select Workspace.
Then do any of the following steps:
- Create or modify an entry for
python.pythonPathwith the full path to the Python executable (if you editsettings.jsondirectly, add the line below as the setting):For example:
- Windows:
"python.pythonPath": "c:/python36/python.exe", - macOS/Linux:
"python.pythonPath": "/home/python36/python",
- Windows:
- You can also use
python.pythonPathto point to a virtual environment, for example:Windows:
"python.pythonPath": "c:/dev/ala/venv/Scripts/python.exe",macOS/Linux:
"python.pythonPath": "/home/abc/dev/ala/venv/bin/python", - You can use an environment variable in the path setting using the syntax
${env:VARIABLE}. For example, if you\’ve created a variable namedPYTHON_INSTALL_LOCwith a path to an interpreter, you can then use the following setting value:"python.pythonPath": "${env:PYTHON_INSTALL_LOC}",Note: Variable substitution is only supported in VS Code settings files, it will not work in
.envenvironment files.By using an environment variable, you can easily transfer a project between operating systems where the paths are different, just be sure to set the environment variable on the operating system first.
Environment variable definitions file#
An environment variable definitions file is a simple text file containing key-value pairs in the form of environment_variable=value, with # used for comments. Multiline values are not supported, but values can refer to any other environment variable that\’s already defined in the system or earlier in the file. For more information, see Variable substitution.
By default, the Python extension looks for and loads a file named .env in the current workspace folder, then applies those definitions. The file is identified by the default entry "python.envFile": "${workspaceFolder}/.env" in your user settings (see General settings). You can change the python.envFile setting at any time to use a different definitions file.
A debug configuration also contains an envFile property that also defaults to the .env file in the current workspace (see Debugging – Set configuration options). This property allows you to easily set variables for debugging purposes that replace variables specified in the default .env file.
For example, when developing a web application, you might want to easily switch between development and production servers. Instead of coding the different URLs and other settings into your application directly, you could use separate definitions files for each. For example:
dev.env file
# dev.env - development configuration

# API endpoint
MYPROJECT_APIENDPOINT=https://my.domain.com/api/dev/

# Variables for the database
MYPROJECT_DBURL=https://my.domain.com/db/dev
MYPROJECT_DBUSER=devadmin
MYPROJECT_DBPASSWORD=!dfka**213=
prod.env file
# prod.env - production configuration

# API endpoint
MYPROJECT_APIENDPOINT=https://my.domain.com/api/

# Variables for the database
MYPROJECT_DBURL=https://my.domain.com/db/
MYPROJECT_DBUSER=coreuser
MYPROJECT_DBPASSWORD=kKKfa98*11@
You can then set the python.envFile setting to ${workspaceFolder}/prod.env, then set the envFile property in the debug configuration to ${workspaceFolder}/dev.env.
Note: When environment variables are specified using multiple methods, be aware that there is an order of precedence. Environment variables contained in the
.envfile specified by thepython.envFilesetting (user or workspace) will override variables defined in theenvFilespecified inlaunch.json, as well as anyenvvariables defined in thelaunch.jsonfile itself. Similarly, environment variables defined in theenvFilespecified inlaunch.jsonwill overrideenvvariables defined in thelaunch.jsonfile.
Variable substitution#
When defining an environment variable in a definitions file, you can use the value of any existing environment variable with the following general syntax:
=...${env:EXISTING_VARIABLE}...where ... means any other text as used in the value. The curly braces are required.
Within this syntax, the following rules apply:
- Variables are processed in the order they appear in the
.envfile, so you can use any variable that\’s defined earlier in the file. - Single or double quotes don\’t affect substituted value and are included in the defined value. For example, if the value of
VAR1isabcedfg, thenVAR2=\'${env:VAR1}\'assigns the value\'abcedfg\'toVAR2. - The
$character can be escaped with a backslash, as in\$. - You can use recursive substitution, such as
PYTHONPATH=${env:PROJ_DIR}:${env:PYTHONPATH}(wherePROJ_DIRis any other environment variable). - You can use only simple substitution; nesting such as
${_${env:VAR1}_EX}is not supported. - Entries with unsupported syntax are left as-is.
Use of the PYTHONPATH variable#
The PYTHONPATH environment variable specifies additional locations where the Python interpreter should look for modules. In VS Code, PYTHONPATH can be set through the terminal settings (terminal.integrated.env.*) and/or within an .env file.
When the terminal settings are used, PYTHONPATH affects any tools that are run within the terminal by a user, as well as any action the extension performs for a user that is routed through the terminal such as debugging. However, in this case when the extension is performing an action that isn\’t routed through the terminal, such as the use of a linter or formatter, then this setting will not have an effect on module look-up.
When PYTHONPATH is set using an .env file, it will affect anything the extension does on your behalf and actions performed by the debugger, but it will not affect tools run in the terminal.
If needed, you can set PYTHONPATH using both methods.
An example of when to use PYTHONPATH would be if you have source code in a src folder and tests in a tests folder. When running tests, however, those tests can\’t normally access modules in src unless you hard-code relative paths. To solve this problem, add the path to src to PYTHONPATH.
The value of PYTHONPATH can contain multiple locations separated by os.pathsep: a semicolon (;) on Windows and a colon (:) on Linux/macOS. Invalid paths are ignored. If you find that your value for PYTHONPATH isn\’t working as expected, make sure that you\’re using the correct separator between locations for the operating system. For example, using a colon to separate locations on Windows, or using a semicolon to separate locations on Linux/macOS results in an invalid value for PYTHONPATH, which is ignored.
Note: PYTHONPATH does not specify a path to a Python interpreter itself, and should not be used with the
python.pythonPathsetting. For additional information about PYTHONPATH, read the PYTHONPATH documentation.

